| |

Apache NiFi Tutorial
Apache NiFi tutorial provides basic and advanced concepts of the Apache NiFi. Our tutorial is basically designed for beginners as well as professionals who want to learn the basics and programming concepts of Apache NiFi. This tutorial contains several sections, some of which may not be useful for some readers because some information is for first time users. The guide we are giving in this tutorial is intended to provide knowledge how to work with NiFi. To work with NiFi, you should have the basic knowledge of Java, Data ingestion, transformation, and ETL. You should also be familiar with the regex pattern, web server, and platform configuration. In this tutorial, we are going to discuss the following topic:
What is Apache NiFi?Apache NiFi is an open-source data ingestion platform. It is a powerful and reliable system used for processing and distributing data between different systems. Apache NiFi helps to manage and automate the flow of data between the systems. NiFi originally stands for Niagara Files (NiFi) that was developed by NSA but is now maintained by Apache foundation for further updates. It provides web-based User Interface (UI), which uses HTTPS protocol to run NiFi on a web browser that makes user interaction secure with NiFi. Note that the latest version of Apache NiFi is 1.11.4 that is released on March 2020.It is a web-based UI platform where we need to define the source, processor, and destination for the collection of data, transmission of data, and data storage, respectively. Each processor in NiFi has some relationships (such as success, failed, retry, or invalid data, etc.), which are used while connecting one processor to another. Why Apache NiFi?Apache NiFi helps to manage and automate the flow of data between the systems. It can easily manage the data transfer between source and destination systems. It can be described as data logistics. Apache NiFi helps to move and track data similar to the parcel services as how data move and track. It provides web-based User Interface (UI) to manage data in real-time. As we have already discussed that Apache NiFi is an open-source, therefore it is freely available. It supports various data formats (such as logs, social feeds, and geographical location data, etc.) and protocols (such as KAFKA, SFTP, and HDFS, etc.). \Supports of a wide variety of protocols make this platform more popular in IT industry. Below are some reasons given that why use Apache NiFi:
History of NiFiNiFi originally named Niagara File, which is now known as Apache NiFi. It was developed by National Security Agency (NSA) which is now handed over to the Apache Software Foundation. 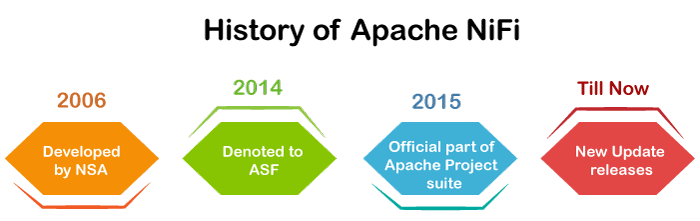
The changes that made in the history of Apache NiFi is given below year-wise:-
Features of Apache NiFiApache NiFi supports the directed graph of data routing, system mediation, and transformation. There are some reasons why NiFi came up is because of the data challenges we have. NiFi has a list of data challenges that are the features of NiFi. So, the various features of NiFi are described below: 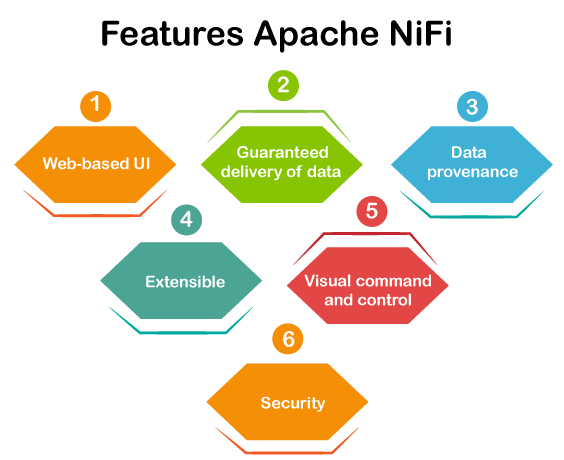
1. Web-based UI - NiFi offers web-based User Interface (UI) that can run over HTTPS, which makes user interaction secure with NiFi. It also manages the data in real-time. NiFi provides experience with design, control, monitoring, and feedback. 2. Guaranteed Delivery - It is one of the most important and very powerful features of Apache NiFi that the delivery of data is guaranteed to be done. It can be achieved by the effective use of persistent write-ahead log and content repository. They both are designed together in such a way that allows for high transaction rate, copy-on-write, effective load spreading. NiFi is highly configurable. 3. Data Provenance or Data Lineage - NiFi provides a data provenance module for tracking and monitoring data flows from beginning to end. NiFi automatically records, indexes, and makes available the provenance data as objects flow through the system. For supporting compliance, optimization, troubleshooting, and many other scenarios, this information becomes very useful. 4. Extensible - This feature allows you to create your own processor. It enables fast development and effective testing. NiFi supports secure protocols such as SSH, SSL, HTTPS, encrypted content and also provides multi-tenant authorization as well as internal policy management. In NiFi, the number of different connectors is increasing.
5. Visual Command and control - Dataflows can be quite complex. NiFi has an interactive user interface for the user, capable of visualizing and expressing the dataflows. It allows the visual formation of dataflows and helps to express them visually to reduce the complexity of dataflow. NiFi not only enables the visual formation of dataflows but is performed in real-time. If you make any change in data flow or modify it, that change is immediately reflected. You don't need to stop the entire flow to make any specific modification. 6. Security - Apache NiFi offers system to system, user to system, and multi-tenant authorization security feature. NiFi uses secure protocols such as SSL, SSH, and HTTPS for security reasons. It also uses other encryption to make data secure. Advantages of Apache NiFi
Disadvantages of Apache NiFi
Architecture of Apache NiFiApache NiFi has a processor, flow controller, and web server that executes on the JVM machine. Additionally, it also includes three repositories, as shown in the figure, which are FlowFile repository, Content repository, and Provenance repository. NiFi runs within a JVM (Java Virtual Machine) on a host Operating System and every data or metadata store in repositories. The well-organized architecture of NiFi is as follows: 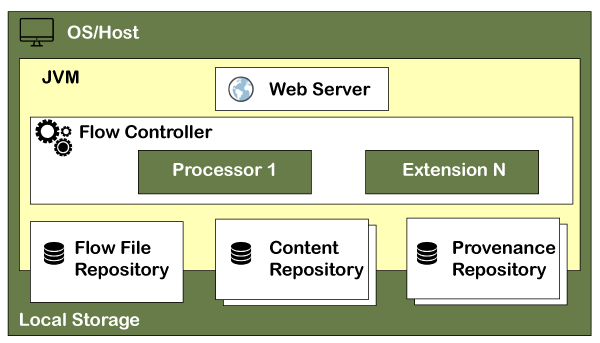
The key components of Apache NiFi architecture are discussed below in detail: Web ServerThe Web Server hosts the HTTP-based commands and control API of NiFi. Flow ControllerThe flow controller provides threads to execute the extensions. It also schedules the extensions when resources are received to execute. It works as a brain of operations. ExtensionExtensions are various type of plugin that allows Apache NiFi to interact with different systems. Extensions help the process to complete the task. NiFi has several types of extensions. These extensions are executed and operated within the Java Virtual Machine (JVM). FlowFile repositoryThe FlowFile repository contains the current state and attribute of each FlowFile that passes through the data flows of NiFi. NiFi keeps track of the state in FlowFile repository, which is currently active in the flow. The root directory is the default location of this repository, it can be changed. The default location of this repository can be changed by changing the property "nifi.flowfile.repository.directory". Content repositoryThe content repository stores all the data present in all the flowfiles. Implementation of the content repository is pluggable same as the FlowFile repository. Its default approach is a simple mechanism to store block of data in file system. The default directory of content repository is in root directory of NiFi and can be changed by changing the "org.apache.nifi.controller.repository.FileSystemRepository" property. Provenance repositoryThe provenance repository is the repository that stores all the provenance event data. Event data is indexed and searchable within each location. It allows the user to check information about FlowFile, which means it tracks and stores all the events of all flowfiles that flows in the Apache NiFi. It also enables the troubleshooting if any issue occurs while processing FlowFile Provenance repository has divided into two types:
Apache NiFi can also work within a cluster. 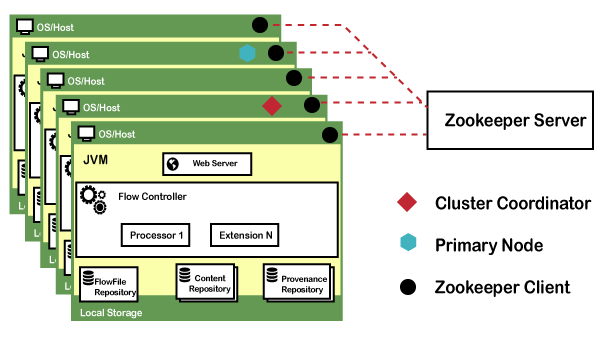
A Zero-Master Clustering paradigm is employed with the beginning NiFi 1.0 first version release. In NiFi cluster, each node works on a different set of data, but it performs the same task on the data. Apache Zookeeper chooses a single node as the cluster coordinator and handles the failure automatically. Each node of the cluster reports to the cluster coordinator about heartbeat and status. The cluster coordinator is responsible for connecting or disconnecting the nodes. In addition, each cluster again has a primary node, which is also selected by Zookeeper. You can interact with NiFi cluster as a data flow manager or end developer using the user interface (UI) of any node. Any changes that are made by the user are replicated for all nodes of the cluster, which will allow several entry points. Key concepts of Apache NiFiWhile discussing NiFi Architecture, the user must be familiar with the following key terms of Apache NiFi. So, we will discuss fundamental key concepts at a high level. They are related to the idea of Flow-Based Programming (FBP). FlowFlow is created by connecting two or more different processors. It is used to transfer the data from one data source to another destination data source. This data can be modified if required. ProcessorA processor is a java module used to either fetch data from the source system or to be stored in the destination system. There are many other processors available that can be used to add attribute or alter/change the content in the FlowFile. Processor is responsible for sending, receiving, creating, splitting, merging, transforming, routing, and processing flowfiles. ConnectionConnection is known as a bounded buffer in FBP terms. It is a link between processors that connects the processors. It acts as a queue that holds the data in queue when needed. It allows several processes to interact at different rates. Process GroupA process group is a set of NiFi flows. It helps the users to manage the flows and keep them in a hierarchical manner. Basically, it is a set of processes and their connections, which can receive data through the input ports and send through the output ports. FlowFileFlowFile is the original data with which meta-information is associated. It represents each object that is moving through the system. The NiFi processor changes to the FlowFile while object moves from source to destination processor. Basically, a FlowFile is created by parts that are Content and Attributes. Content is the user data and Attributes are the key-value pairs that are attached with user data. Data ProvenanceIt is a repository, which allows the user to check information about FlowFile. It also enables the troubleshooting if any issue occurs while processing FlowFile. Prerequisites of Apache NiFiBefore using Apache NiFi, following things must be done on your system:
Along with these requirements, you should have the basic knowledge of Java, Data ingestion, transformation, and ETL to work with Apache NiFi. Users should also be familiar with the regex pattern, web server, and platform configuration. Note that NiFi is more compatible with Java version 8 or 11. So, we suggest you to download the required version of Java.Install Java and setup environment variable
Now, the next step is to setup the Java Environment Variable -
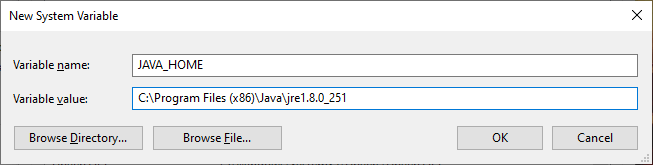
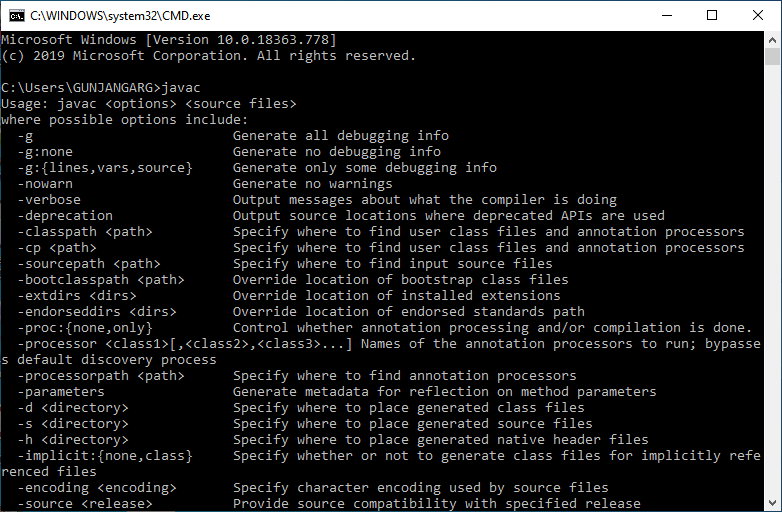
Now, verify that Java is installed and the environment variable is set up successfully.
Now you can download and install Apache NiFi on your system. Installation of Apache NiFi on WindowsIn this tutorial, we will install the setup of Apache NiFi on Windows Operating System. For step by step installation of Apache NiFi, follow the steps given below: Step 1: Click on the following link https://nifi.apache.org/download.html and download the latest version of Apache NiFi.
Step 2: Under the Binaries section, click on the zip file of NiFi setup for windows OS, as shown in the below screenshot. 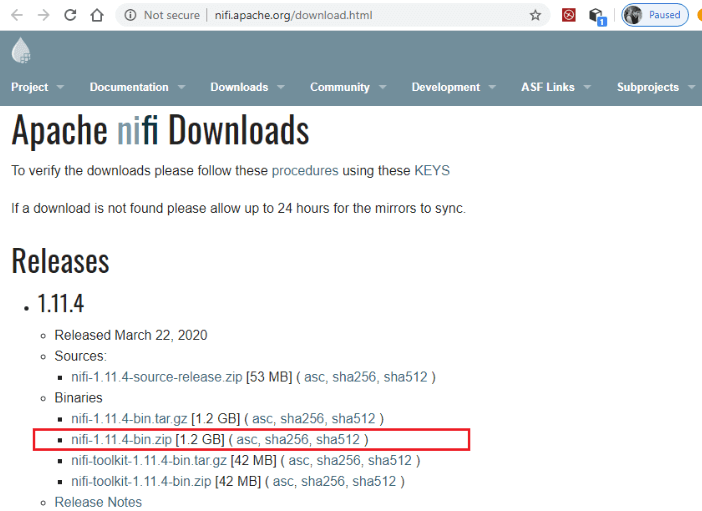
Step 3: The above link will redirect you to a new page. Here, click on the first link as shown in the screenshot below. We are downloading the latest version of NiFi, i.e., 1.11.4. 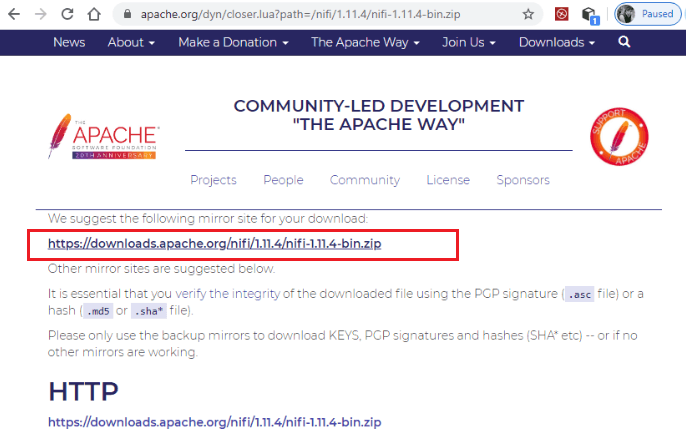
Step 4: Once the download is complete, extract the downloaded zip setup of Apache NiFi. To extract the zip file, right-click on the downloaded file and select Extract here. 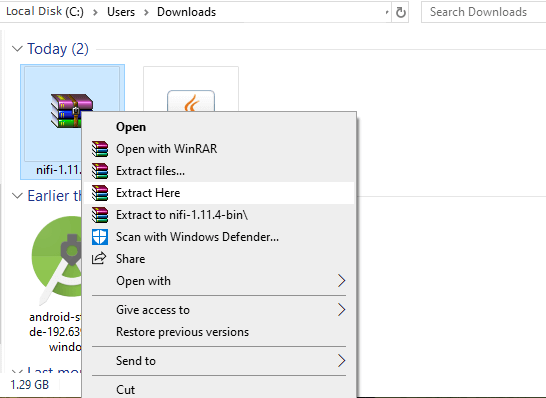
Step 5: The zip file will start extracting. 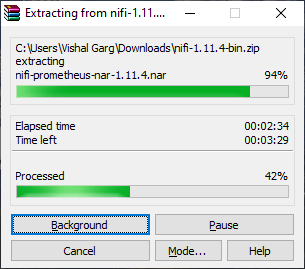
Note: Remember that Java must be installed on your system and environment variable have to be set as well. So, first make sure Java is installed. If not, install it and set the Java environment variable as well.Step 6: Now, Go to the bin folder inside the extracted folder, i.e., nifi-1.11.4/bin. Click on the run-nifi window batch file and run it to start NiFi. 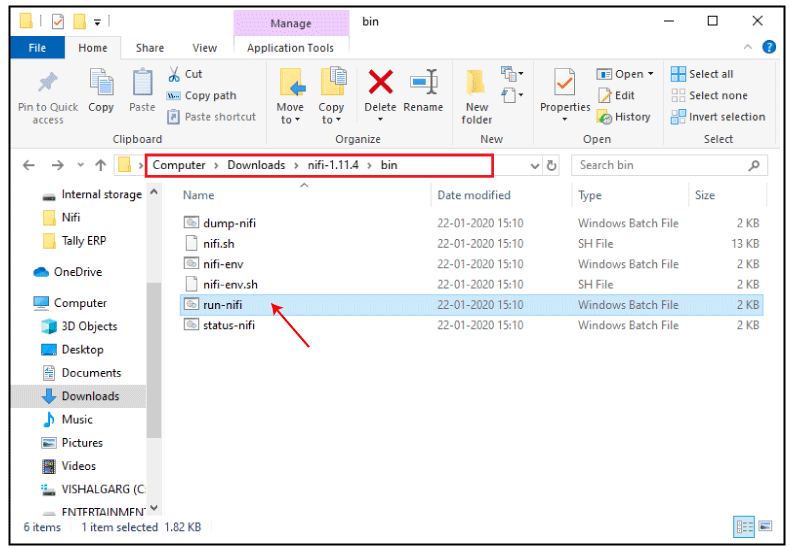
Step 7: The run-nifi.bat will run the command prompt, which will look like the below screenshot. This bat file must be executed before running NiFi on a web browser. 
NiFi has been started. Now you can open it from any web browser like Chrome, or Internet Explorer, etc. So, we need a port number to run the NiFi UI on a web browser. Step 8: Therefore, go to the conf folder (nifi-1.11.4/conf) that has all the configuration files for NiFi and open the nifi.properties file in notepad. Scroll down and check the port number of nifi. 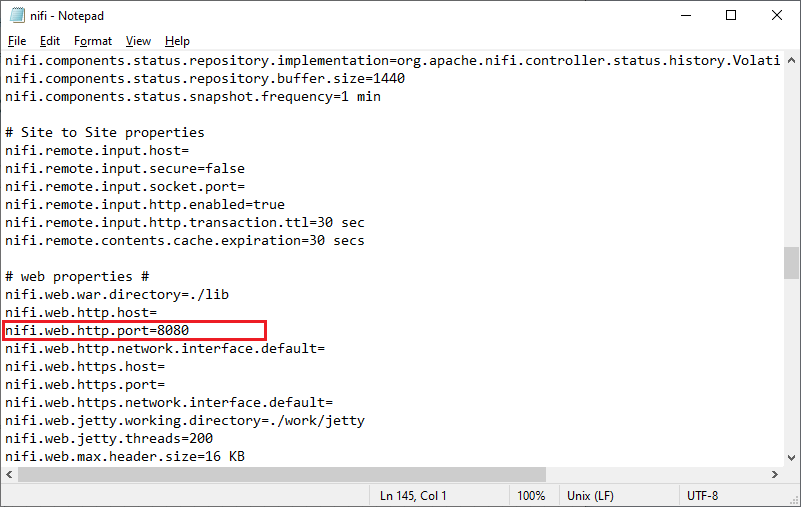
The default port of Apache NiFi is 8080. If the default port number is already assigned to any other software program, change the port number such as 9090 and save the file. 
Step 9: Now, open the web browser and type https://localhost:8080 in your browser tab. Here, we have used default port 8080 to run the NiFi because port 8080 is free on our system. Step 10: The dashboard of NiFi will launch on the browser on successful installation. The dashboard screen of Apache NiFi is called canvas, where we place the components to create data flows. 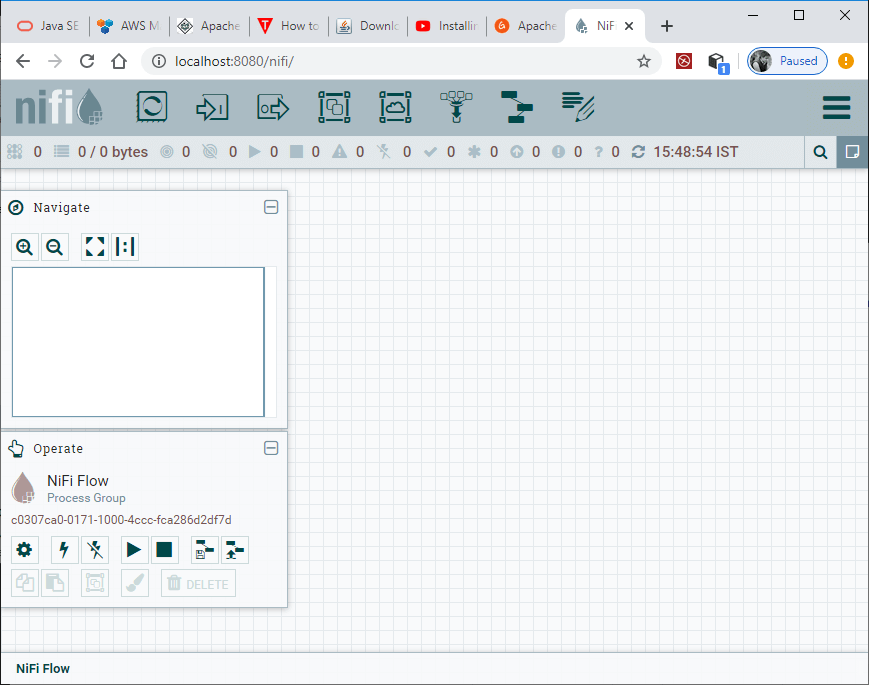
Issues while running Apache NiFi on web browserNiFi will run on the web browser successfully by following above installation steps. If not, then this can be done because of these reasons:
Resolved the mentioned issues and retry again to run NiFi. Change Port NumberIf the NiFi gives the error "This site can't be reached" on the web browser, it may be port is not free. So, follow the steps below to change the port number: Step 1: Go to the conf folder inside the extracted zip folder, i.e., nifi-1.11.4/bin. It contains all the configuration files for NiFi. 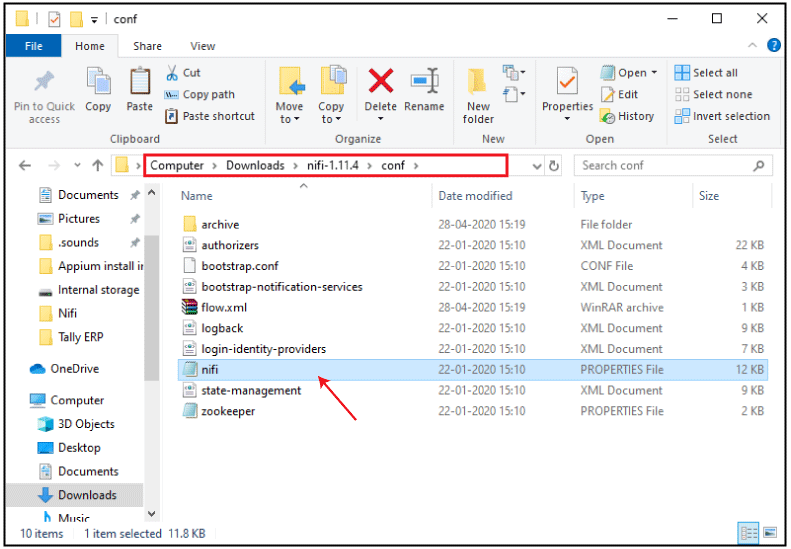
Step 2: Open the nifi.properties file with notepad or any other text editor tool and change the port number and save the file. nifi.web.http.port=9090 
Retry again and run the Apache NiFi on the web browser with a new port number. User Interface of Apache NiFiOnce the NiFi has been started successfully, UI will bring up to you to create and monitor the dataflows. NiFi UI provides an interactive interface that can be accessed by the users on a web browser. Users can drag and drop components in NiFi. It provides various type of information about NiFi such as:
The below screenshot is User Interface of Apache NiFi: 
Components of Apache NiFiThere are following components of Apache NiFi, which are listed under the component section of the toolbar - 
ProcessorProcessors are basic blocks that are used for creating a data flow. Apache NiFi has several processors, where each processor has different functionality. Users can drag and drop the processor icon on the canvas to add the processor and then select the desired processor to create the dataflow. 
Drag the process icon on the canvas that will open an Add Processor window. Choose the desired processor you needed for the data flow in Apache NiFi. 
To know more about the processor, right-click on it and go to Usage. This will bring up the documentation of the processor. It provides information like what a processor does, properties that need to be configured, and the relationship for the processor. Input PortAn input port is used for getting data from the processor, which is not present in that process group. The input port can be dragged on the canvas by clicking on the icon given below. To add an input port to any data flow, drag the icon on canvas. 
After dragging the icon onto the canvas, NiFi asks you to enter the name for the input port. Provide the name of the input port and click on the Add button. 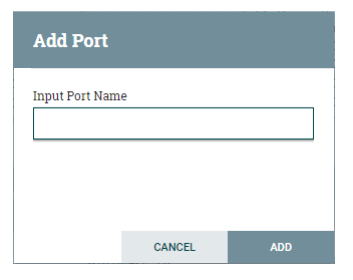
Output PortAn output port is used for transferring data to the processor, which is not present in that process group. The output port can be dragged on the canvas by clicking on the icon given below. To add the output port to any data flow, drag the icon on canvas. 
After dragging this icon onto the canvas, NiFi pops up a screen to enter the name for the output port. Provide the name of the output port and click on the Add button. 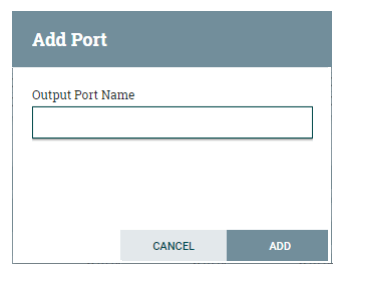
Process GroupThe below icon is used to add the process group in NiFi canvas. 
After dragging this icon to the canvas, NiFi pops up a screen where enter the name of the Process Group and then add it to the NiFi canvas by clicking the Add button. 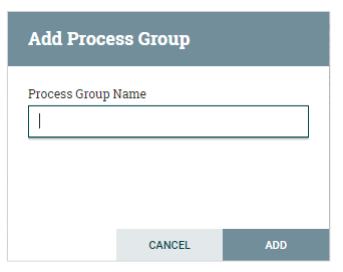
Remote Process GroupThe below icon is used to add the process group in NiFi canvas. 
TemplateTemplates are used to reuse the data flow in same or different NiFi instances. The icon that is given below is used to add the template onto the NiFi canvas. 
After dragging the Template icon, the user can choose the template already added in NiFi. FunnelFunnel helps to transfer the output of a processor to several other processors. With the help of below icon, a user can add the funnel to a data flow. 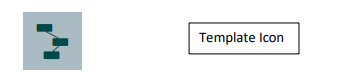
LabelLabels are used to add the text about any components that exist in NiFi. It also provides various color options. The developers can change label color as well as size of the text. They can use these colors to add an aesthetic sense. 
In the top menu of NiFi UI, first leftmost icon is used to add label in NiFi canvas. How to build a flow?In this example, we are going to build a simple two processor flow. First of all, we will add two processors on canvas window and configure each of them. After configuring both the processor, we will connect and run them. Add and configure processorsStep 1: To add a processor on the canvas, go to the component section in the toolbar and drag a processor component. This will open a Add Processor window, where you go through the list of processors. Step 2: Find the required processor or click on its tag under the Tag Cloud to reduce the list of processors by category and functionality that you are looking for a processor. 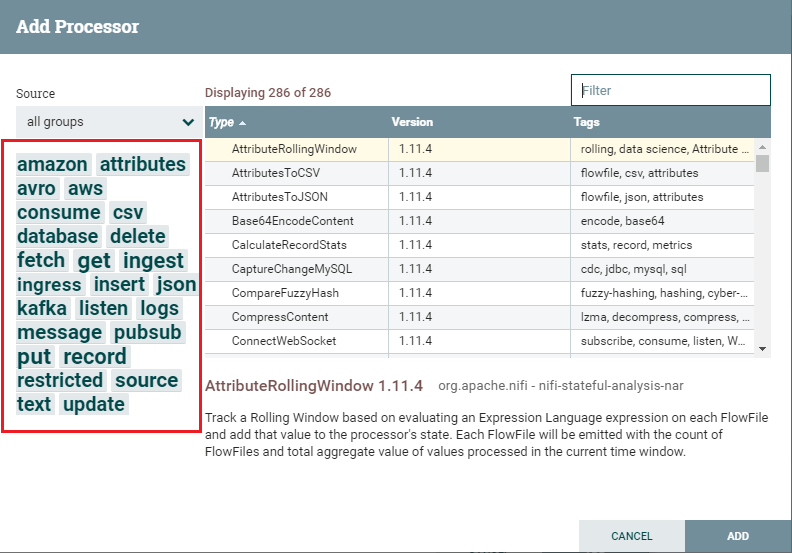
Step 3: Click on the processor that you want to select and add it to the canvas by clicking on the Add button. Similarly, drag the processor icon again, type the name of the processor you want and double-click to add it to the canvas. 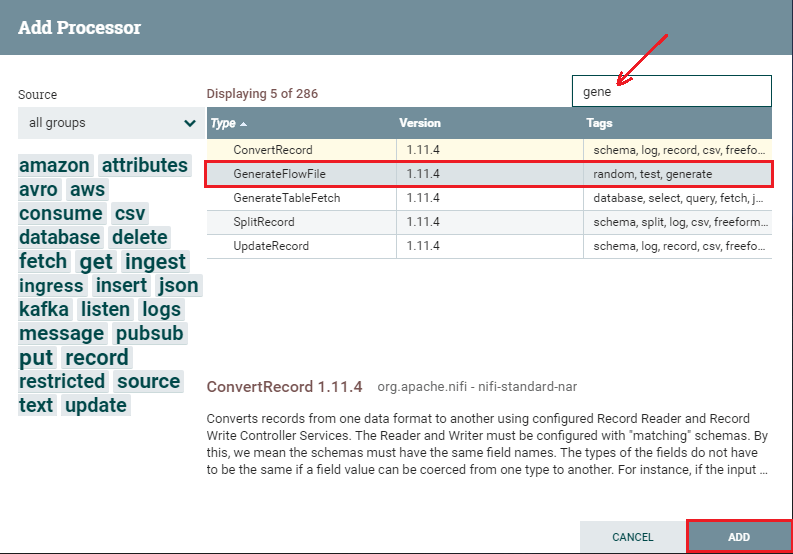
Step 4: If you already know the processor name that you want, you can simply type the name of the processor up here in the filter bar. After that, double-click on the processor to add it to the canvas. By using the above steps, add two processors on the canvas. 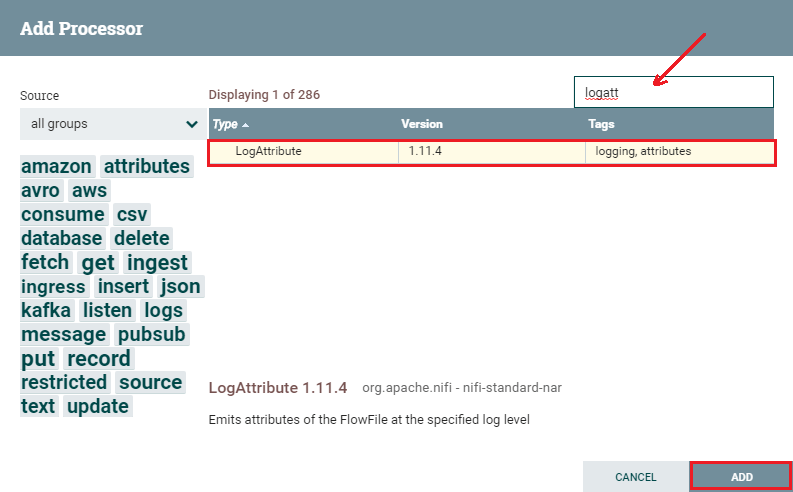
Step 5: But you will see that both processors are invalid because they have a warning symbol in the upper left corner of the processor base. Hover the mouse over the warning icon, it will show the minimum requirements need to be configured to make processors valid and able to run. 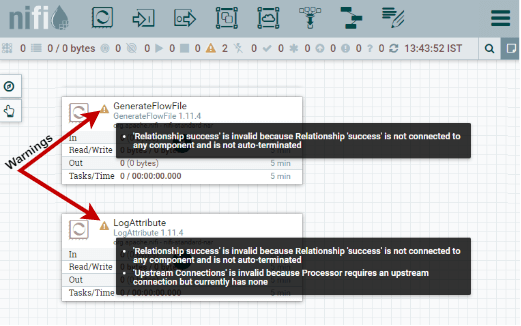
Note: To know more about the processor, right-click on it and go to Usage option. It will show you the documentation for the processor.Step 6: To configure the processor, simply right click on the respective processor and go to configure. 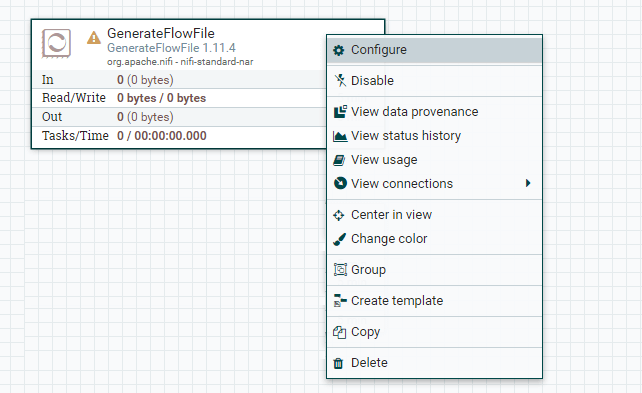
A window of Configure Processor with default values will pop up to you. This will bring up a new window containing four tabs, i.e., Setting, Scheduling, Properties, and Comment. 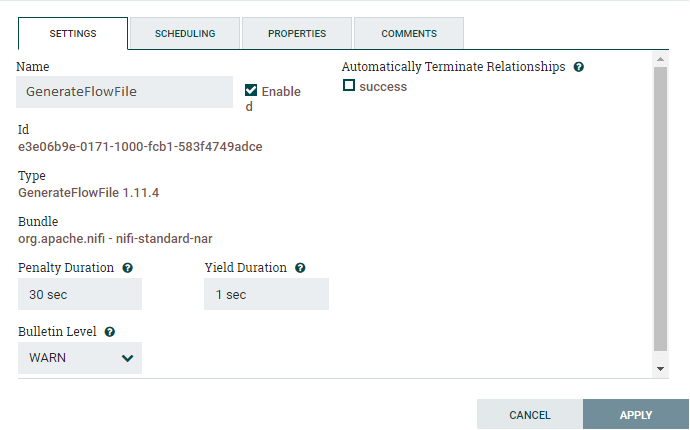
Configure GenerateFlowFile ProcessorSetting Go to the Setting tab and change the name of the processor in Name field, because by default its name is the processor type. Each processor has a unique id number, which is not configurable. 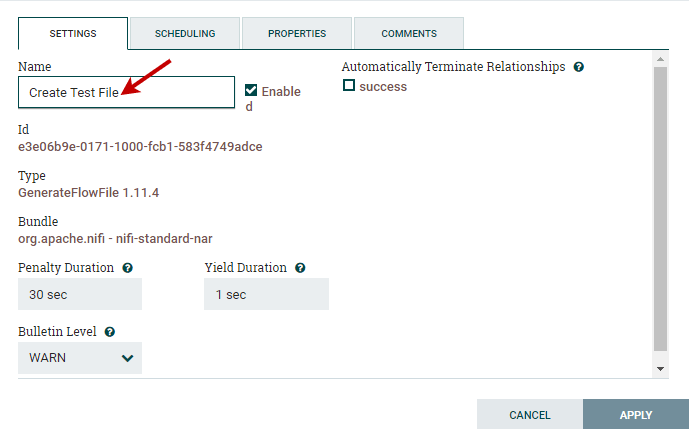
This processor only has success relationship. So, leave the Automatically Terminate Relationship unchecked because we want to continue to the next processor in the flow. Scheduling The scheduling tab defines how to run, how often to run, and how long to run. Set the Run Schedule to 1 sec because this processor can produce test files very fast. Leave all other fields as default for now. 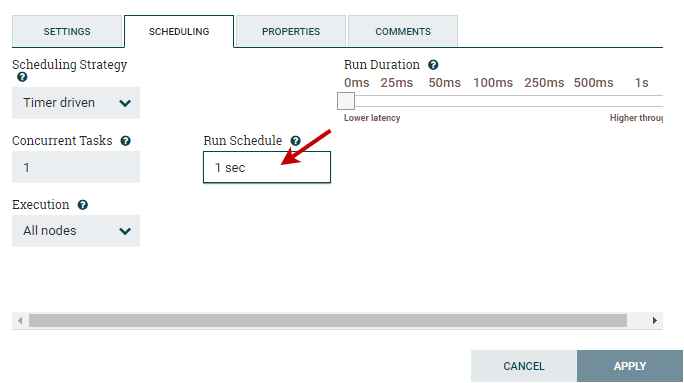
Properties Properties tab is the main tab where you configure the information that the processor needs to run properly, where properties that are not in bold letters are optional. Double click on the File Size row to change the size of the file. 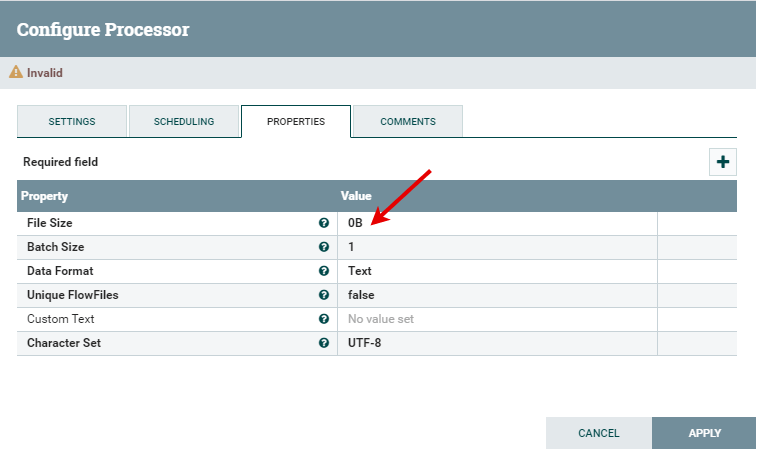
Here change the File Size from 0B to 1KB and click on the OK button. 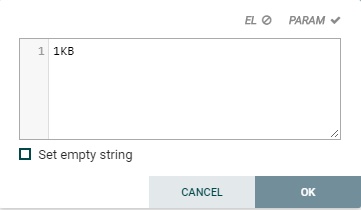
Comment In the comment tab, type any comments like why you configured the processor or the way you did. Step 7: Now, click on the Apply button to save all the changes are made and complete the configuration of GenerateFlowFile processor. 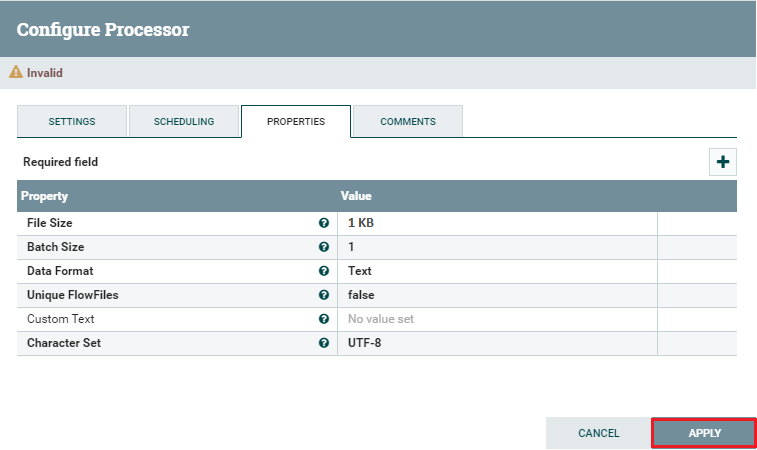
Configure LogAttribute ProcessorSimilar to the GenerateFlowFile processor, right-click on it and go to Configure, where we will change a couple of things that we didn't in FlowFile processor. Here you will also get a new window containing four tabs, i.e., Setting, Scheduling, Properties, and Comment. Step 8: Go to the Setting tab and change the Buttetin Level drop-down list to INFO in place of WARN. 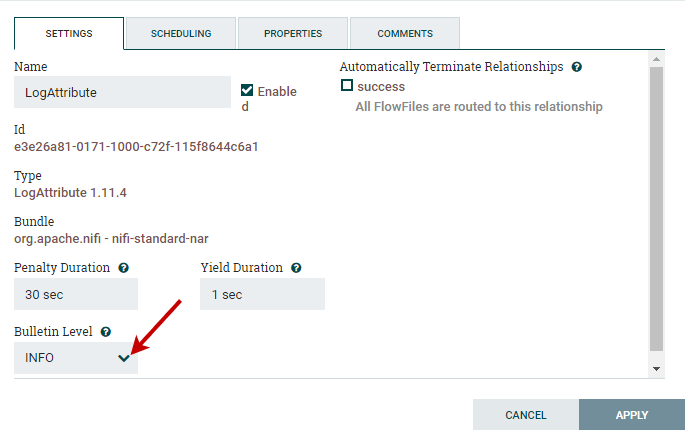
Step 9: Mark the success checkbox under the Automatically Terminate Relationships on the right side of window. 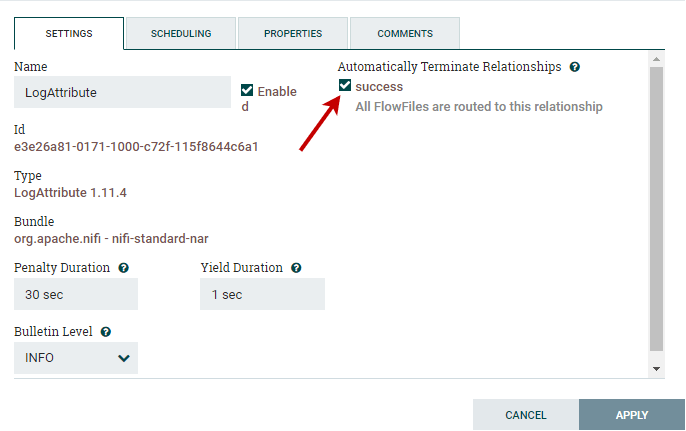
Step 10: Leave other sections of all tabs with default settings and click on the Apply button to complete the configuration of the GenerateFlowFile processor. After completing the above steps, you can see that both the processors are still invalid. This is because we have not connected them. So, we will now connect both processors and run. Connect and run processorsStep 1: To connect the processors to each other, hover the mouse over the center of the processor, an aero in a circle will show. Drag the mouse from that circle to another processor until it highlighted in green. 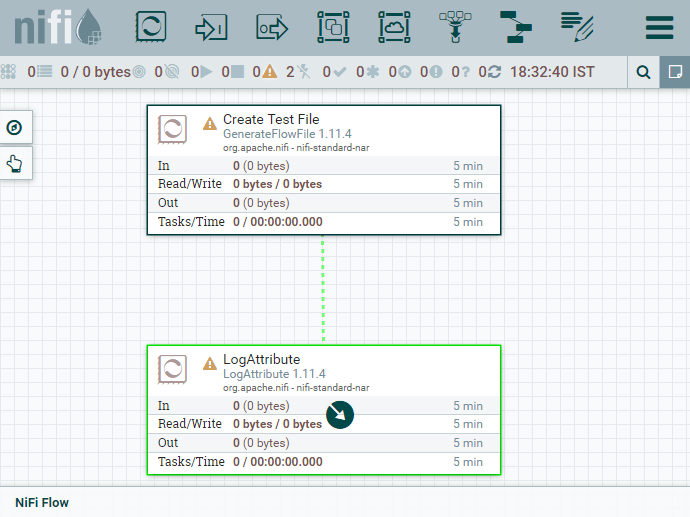
Step 2: Release the mouse here. A Create Connection window will open containing details and setting tab. Leave the current settings as default for now and click on the ADD button. 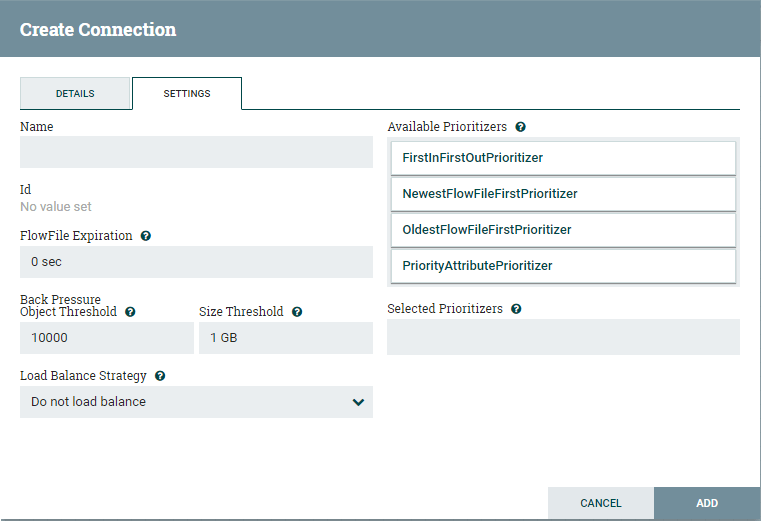
The Details tab shows what the connection is going from and to. It also shows the list of relationships that will be included in the connection. Step 3: Now, you can see that both the processors are valid now as they have a stop symbol in place of warning symbol at the upper left-hand corner. 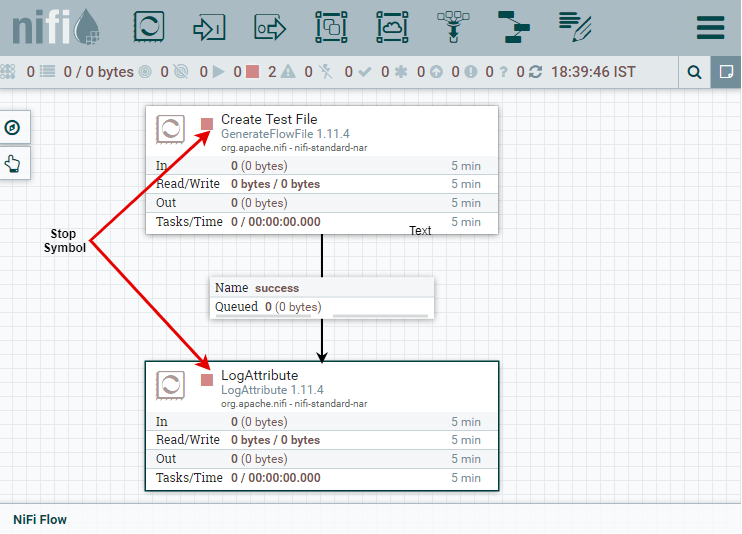
Step 4: To run both processors, select both the processors by pressing the Shift key and click on the Start button present under the Operate section. 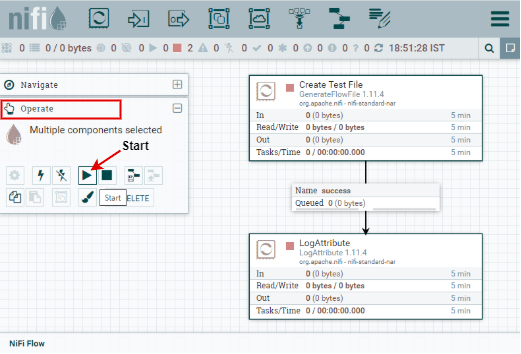
Step 5: Here, the processors have been started running now after connecting successfully. You can see that no information is sent or received by any processor yet. 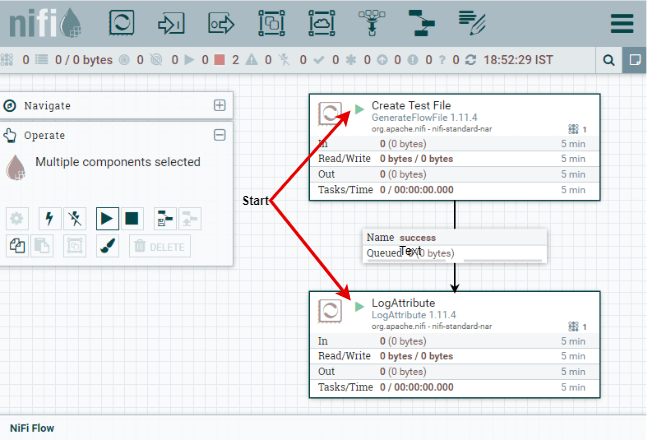
Step 6: Click anywhere on the canvas and select Refresh to see that what the processors are actually doing by the information. 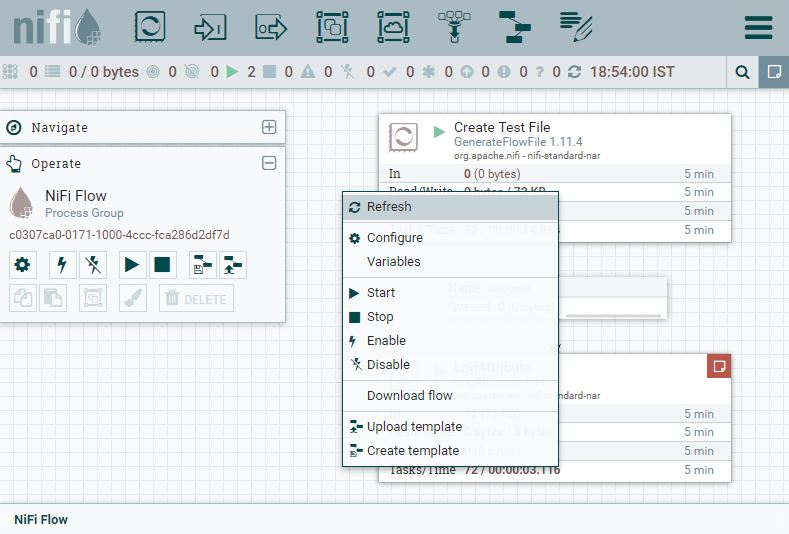
Step 7: You can see that the Log Attribute is producing bulletins. I had configured it to produce bulletins at info level. This information represents what happened in the processors over the last five minutes. 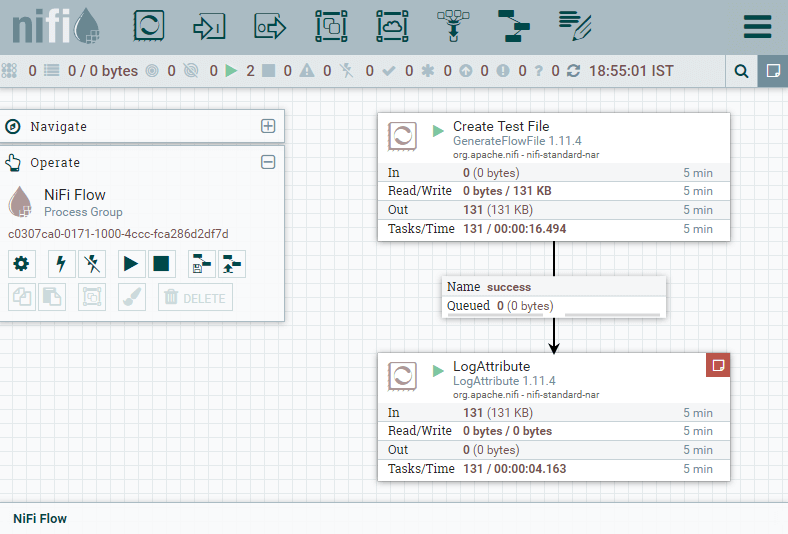
Step 8: Here, you can see that 274KB data is out from the GenerateFlowFile processor and 273KB is received by LogAttribute processor, where 1KB data is queued. The GenerateFlowFile processor is sending information, which is received by LogAttribute processor. 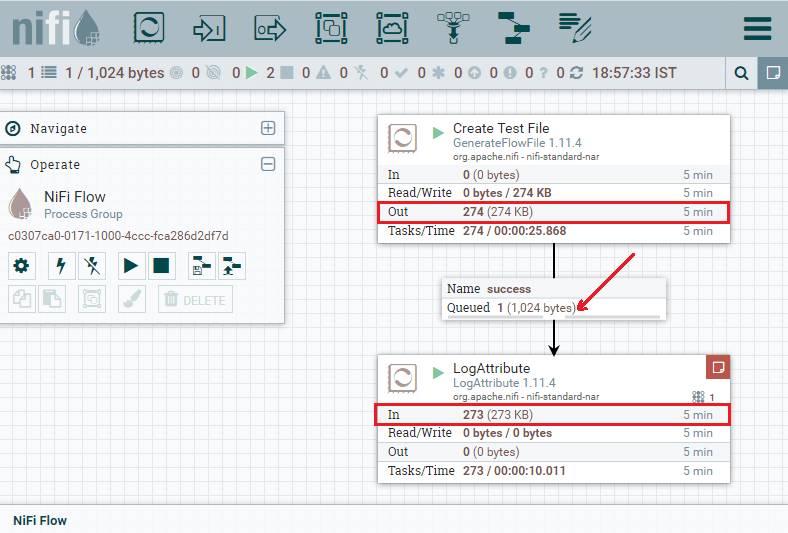
Let's compare both processors, notice that no data is coming into the GenerateFlowFile processor because it does not have any incoming connection. So, it generates data itself. Step 9: Now, let's stop the LogAttribute processor for a few seconds by selecting the processor and click on stop. You will see that the data has been queued up in the connection that is feeding it if we refresh the state, as we have also done earlier. 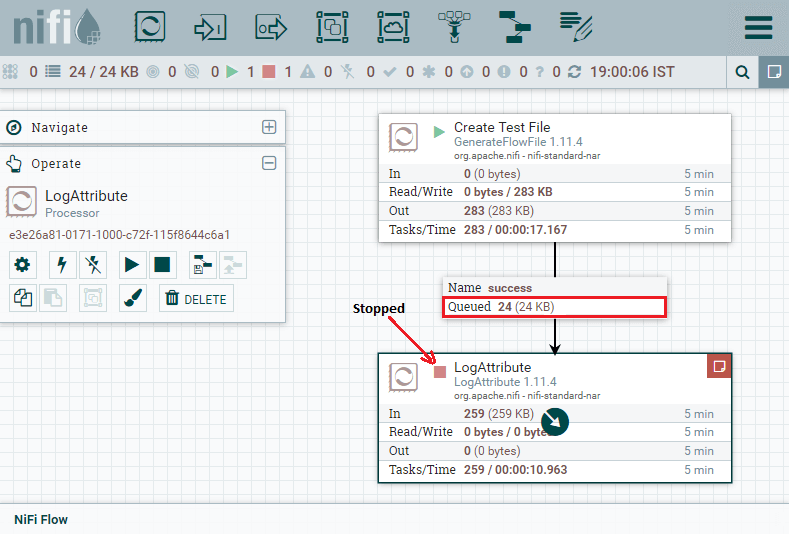
Step 10: Now right-click on Log Attribute processor and choose Start to restart the processor so that the queue data will clear out. 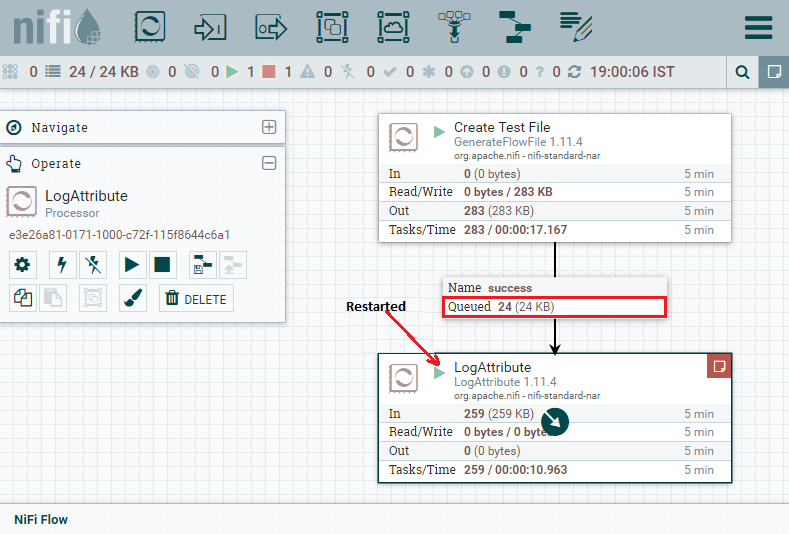
Now, it will run accurately. |
 For Videos Join Our Youtube Channel: Join Now
Feedback
- Send your Feedback to [email protected]
Help Others, Please Share


Javatpoint Services
JavaTpoint offers too many high quality services. Mail us on [email protected], to get more information about given services.
- Website Designing
- Website Development
- Java Development
- PHP Development
- WordPress
- Graphic Designing
- Logo
- Digital Marketing
- On Page and Off Page SEO
- PPC
- Content Development
- Corporate Training
- Classroom and Online Training
- Data Entry
Training For College Campus
JavaTpoint offers college campus training on Core Java, Advance Java, .Net, Android, Hadoop, PHP, Web Technology and Python. Please mail your requirement at [email protected]
Duration: 1 week to 2 week


