| |

Swagger tutorialSwagger is the standard way of documenting the Standard APIs. Swagger is helpful when deploying APIs in azure. Swagger is primarily used for documenting API; now the question arises that why document APIs?. The building APIs that are internal in the enterprise or for the public consumption, the theme is the same that the developers usually use in the apps that they are building. For the other developers to be able to use our API, the API must be properly documented; otherwise, how would they know that what are the endpoints exposed by the api and what are the operations supported on those endpoints? What parameters should they pass, and what will they get back? What authentication methods to use?. To answer these questions, it is very important to document the APIs; if you want APIs to be consumed and properly used. Swagger and Open API specification are the ways to document an API specifying that what exactly APIs can do?. What is API?API stands for Application Programming Interface. It defines how two pieces of software talk to each other. There are several types of APIs, but the swagger specifically deals with the Web API. How do Web APIs work? Let's understand the working the Web API through an example. Suppose we opened the Facebook on our phone and made a request to the Facebook server. The request sent to the Facebook server is known as an API request and the Facebook server will send the response known as API response. The server will only send the data, not the whole web page. It is the responsibility of the app to display the web page. Here, API definition works:
Swagger and Open API specification are mainly designed for the Rest API, where Rest is a type of web API. In Rest word, R stands for Representational, S stands for State, and T stands for Transfer. What is API Definition? The API Definition is a file that describes all the things that we can do with an API. It contains all the requests that we can make to an API. It also describes what request to make and how would response look like for each request. Why create an API definition? There are several advantages of writing an API definition:
API Definition File API Definition File is a file that contains all the things that you can do with a file. This file contains the following things:
Anatomy of a Request There are five different parts to be found in the Http request:
URL is broken down into several pieces: For example: the request URL is: https://api.example.com/v2/user
Note: The host and the base path would remain the same of an API, but the path differs depending upon the request.Request BodyWe mainly specify the request body in JSON format for some methods such as PUT, POST, etc. The body is treated as parameters like path in url. Unlike these parameters, we create the schema for the request body that specifies how the JSON body would look like. In REST, the response body could be anything, but mainly the response body is written in JSON format. The response body is included in the response object. The response body has a schema to represent the structured data. We can also have a separate response object for each HTTP status code returned. SecurityHere, Security means authentication and authorization. Authentication means to validate the user through their username and password. The authorization means allowing the user to access the data. The security can be set in the following ways:
DocumentationThe OAS file or API file contains the human-readable description of elements that generates the documentation automatically. In other words, we can say that a description section is added for the API, for each operation which is a combination of path and method, for each parameter, and for each response element. Structured Data FormatsThe Open API Specification uses the structured data format for its API definition files. We can use one of the two structured formats, either YAML or JSON. YAMLYAML stands for Ain't Markup Language. It is not a Markup language like HTML. It is used for the data, not for the content. YAML uses minimum characters as compared to JSON and XML. It is mainly used for the configuration files rather than the files which are passed over the web like JSON. Key/value pairs The data in YAML is represented in the form of key/value pairs. Key/value pairs are indicated by a colon followed by a space. For Example: In the above example, Date and First Name are the keys, and 2021-07-08 and John are the values. Levels Levels are indicated by white space indenting, but we cannot use tab indent. This is the biggest difference between the YAML and the other structured formats. XML uses tags that add one level, and inside the tag, there are other tags that add another level; so, this increases the number of characters. In JSON, opening and closing brackets indicate one level that occupies many characters. In YAML, the only indentation is used, which occupies fewer characters. XML: JSON:YAMLTypesThe types in YAML are determined from the context. For example: In the above scenario, part_no will be treated as a string, description will also be treated as a string, price will be treated as a floating type, and quantity will be treated as an integer. Note: In YAML, we don't need quotes around the strings. There is one exception that if something is interpreted as a number or Boolean, then quotes are required.List
As we can observe in the above example, that cart is the name of the list, and there are two list items in the cart. Both the list items are represented by the dash. The first list item contains 4 key-value pairs, whereas the second list item contains 5 key-value pairs. Multi-line StringsAs we know that strings do not contain quotation marks so we need special characters for multiline strings. The following are the characters used for the multi-line strings:
In the above example, we have used '|' character so its output would be same as it is written above. Output YAML and JSON If we use > character instead of '|' character: S: >
    YAML
and JSON.
Output YAML and JSON History of Swagger
Open API Initiative
Before understanding what is swagger, we will first understand what is Open API specification? What is Open API specification?Initially, it was named as swagger specification, but later it was renamed as Open API specification. The Open API specification is a specification where the specification is a set of rules that specifies how to do something. Therefore, Open API specification is a set of rules that describes how to specify our Restful APIs in a language. Irrespective of the technology that the api use, such as JAVA, PHP, .NET, or something else, we want our API to be easily consumed by the other developers that they are building. In order to understand the API properly, we should know all the following about the API: What are the available endpoints like /customers, /employees, /orders, etc., available operation at each endpoint like GET, PUT, POST, DELETE, etc. what operations are available at each endpoint exposed by our API? What parameters to pass and their data types? What will be API return and its data type, authentication methods to use? We want our external world or even our internal clients should know about our API without necessarily sharing the source code. So, there must be some set of rules and standards that we should follow to describe the API, and everyone will follow the same set of rules and describe their api in the same way. Here, Open Api Specification plays a role that simply defines a set of rules that specifies how to describe a Restful APIs. They have rules that describes every aspect of the Restful service. There are certain rules that specify the available endpoints at API. Similarly, there are rules that specify the operation at each endpoint, basically there are rules for everything for example, for their parameters, for their data types, return values, authentication methods, etc. The open API specification can also be defined as a standard and language agnostic way to describe a Restful API. The idea is to create a document following these rules either in a JSON or YAML format that describes your entire API such as available endpoints, available operations, what parameters to pass, return value, their data types, and authentication methods. Let's see how to build an OAS file. We will consider an example and then build a file. Suppose the company name is javatpoint.com, and the API service is uploading and sharing photos. Here, the API base URL is https://api.javatpoint.com/photo The following is the example that how to start a file. In the above code, Open API specification calls swagger: 2.0 before writing the Open API specification. The next step is to write about the file itself which is done with a key 'info:'. Under info, we have a version of string and title of API. After title, the host of the API is api.javatpoint.com, basepath is /photo because the url is api.javatpoint.com/photo. The list of schemes which in this case only has schemes. Adding a Request Let's define requests for getting a photo albums. The following is the information that will be included in the request:
Let's understand the query parameters through an example. Get https://api.javatpoint.com/photo/album?start=2021-05-01&end=2021-05-31 API Definition file It starts with a 'paths' key which is the list of keys. In other words, we can say that list of operations by this url are grouped in the paths key. This key starts with '/album' which means that the url ends with '/album'. The method that returns one or more albums uses the GET method so we put after the '/album'. The get method has a list of parameters. In the above YAML, list begins with a '-' because API definition file has a list of query parameters. The list has keys:
Now we retrieve the album of a specific id. Suppose the url of retrieving a specific album is given below: Get https://api.javatpoint.com/photo/album/12345 The above url will retrieve the specific url having unique id 12345. Let's look at the definition. In the above YAML, the key is defined as /album/{id} where id is defined within the curly brackets. This indicates that the path parameter will be defined later with a name 'id'. Then, we have a get method and then we included a parameter list. Here we have added only one list item named as 'id'. The 'in' value is path which means that it is a path parameter, the 'required' field is true which will always be the case in the path parameter, and the type is integer. What is Schema?The certain kind of requests require extra data such as POST, PUT method, and these methods are known as HTTP methods. The body that includes these methods known as request body. The data included in a request body can be formatted either in a JSON or XML format. All the responses represented in a response body can be formatted in a JSON format. Here, schema mainly defines the structure of the data. The OAS schema object is based off the JSON Schema Specification. Schema of the data determines what are the keys in the key/value pairs, what type of data are the values. There can be many levels in a schema. $ref The $ref is a special OAS key that indicates that the value is a reference to a structure somewhere else in the YAML file. It is useful so that we do not have so many indentation levels in the YAML file. Let's understand through an example. File1: File2:In File1, we have defined a $ref key inside the schema having a value '#/definitions/newAlbum'. We have created one more file named as File2 where we have defined a new key named as 'definitions' which has one more key named as 'newAlbum', and the indentation structure is reflected in $ref key in File1. Request body The request body contains the parameters defined under the parameters key. The following is the list of parameters:
Example of Request body The above YAML has a POST request that contains the parameters key. The parameters has a list with a name 'album'. It has a schema that contains $ref key with an intended path of a schema. Schema Section
Example of Schema In the above schema, we can observe that newAlbum has two properties named as name and date, and both are of string type. Note: The values of key/value don't have to be simple type; we can add other objects as values. To do this, we need to follow the steps which are given below:
In the above schema, we can observe that schema is the type of object followed by the properties key. The properties key has two properties named as first name and last name of type string. The above file has lots of indentation. To overcome this problem, we can use $ref from within your definition. Let's understand through an example. In the above case, author key has the $ref key that indicates to the path of the definition of the person key. The person has the properties key that has two properties named as first name and last name. Schema array
The syntax for declaring a schema array is: In the above example, marks is the array having items of type string. Schema array with $ref For the complex type, we use $ref for the array items. Let's understand through an example. In the above schema, photos is the key of type array and has the list of items that are intended to the path of the photo key. The photo key has three properties, i.e., id of type integer, longitude of type number and latitude of type number. What is Swagger?Swagger provides an editor for the Open API Specification files. To visit the swagger editor website, go to the following link: https://editor2.swagger.io Swagger is one of the popular tools used for generating an interactive documentation. It generates an interactive API for the users so that they can understand about the API more quickly. Difference between the Swagger and Open API specification The OpenAPI is a specification whereas the Swagger is a tool used for implementing the specification. The development of the OpenAPI specification is done by the OpenAPI initiative that involves more than 30 organizations from the different areas of the world. Smartbear software is the company that developed the Swagger tool is also a member of the OpenAPI initiative, so it also helped in developing the specification. Swagger is a tool associated with widely used tools for implementing the OpenAPI specification. The swagger toolset includes open source, free and commercial tools used at the different stages of the API lifecycle. The following are the tools included in the Swagger:
Documentation in SwaggerWhat is Autogenerated documentation? Tools such as Swagger takes the OAS files and generate the HTML documentation from it so that it can be updated on the web. As long as the OAS file is kept up to date then the documentation is likely to be more accurate rather than writing the documentation manually. It also allows you try out the requests from within the documentation so that it can help the developer for implementing the code. We will design and document the Restful API using Swagger editor. Suppose we have a Student API and resource from which we will get the students name based on the Query parameter. In Query parameter, we will pass the student name. In this API, we will also have the POST operation that adds new student with the help of this API. We will also perform the GET operation that retrieves the data with the help of path parameter. Open the Swagger editor in the browser as shown as below: 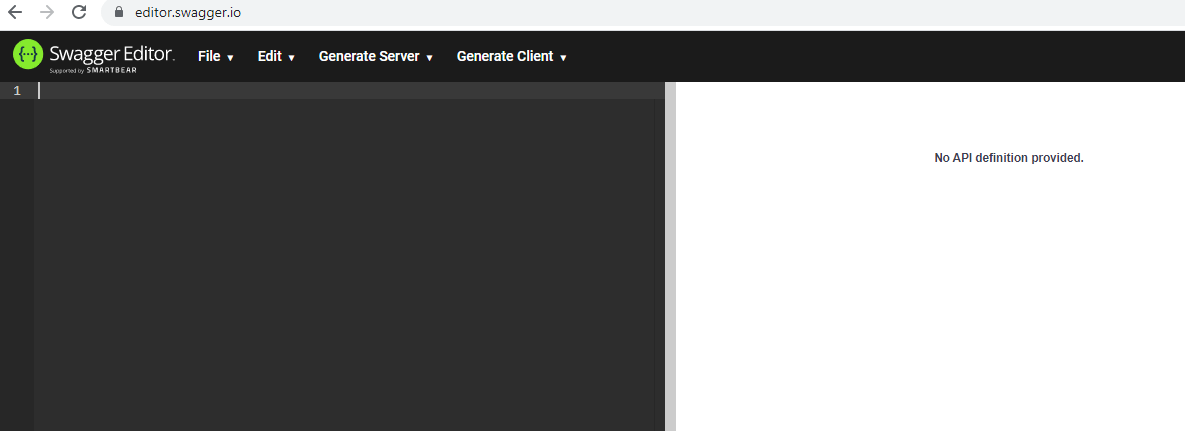
It is a very intelligent tool as it provides a bunch of suggestions. When we press ctrl+space, it provides you lots of suggestions. First, we use openapi having version 3.0.0 shown as below: Now we will add the basic information of our API in the metadata as shown as below: 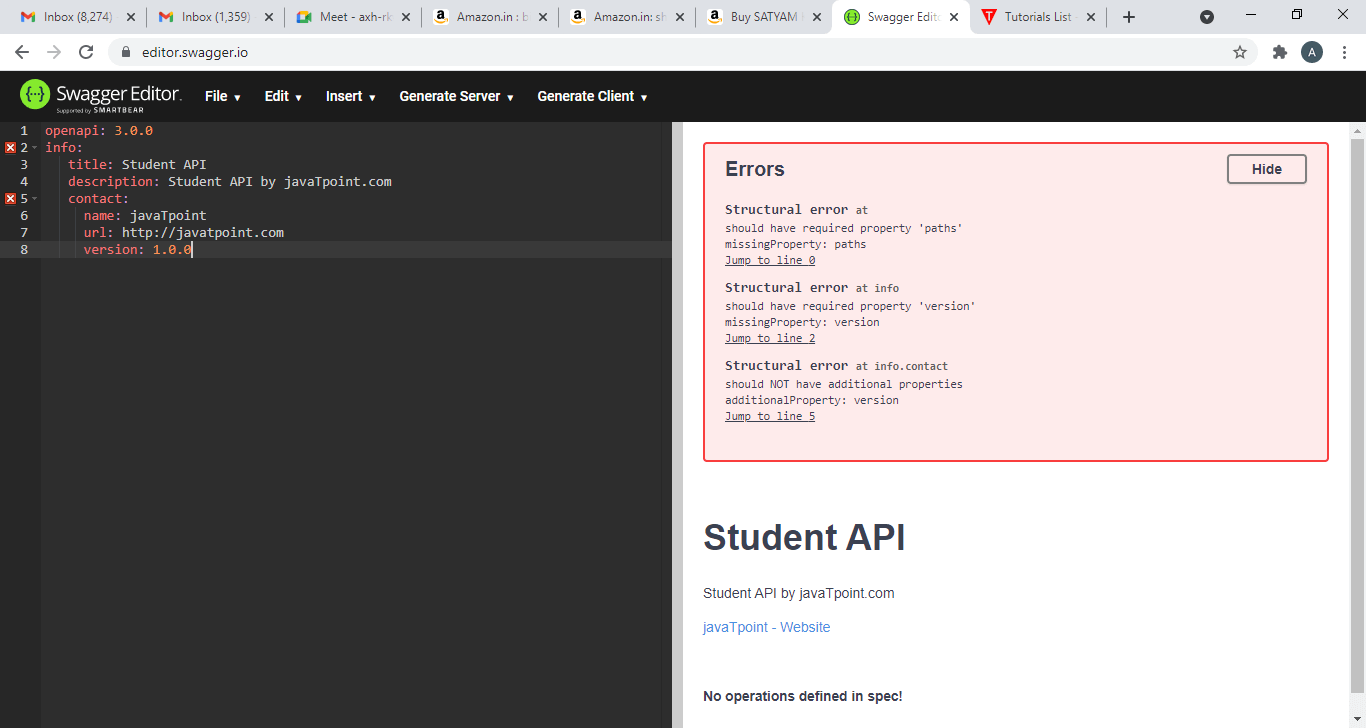
In the above, we have added the basic information such as the title of the API, description of the API and contact of the API. The next we have to add the servers. We can add the multiple servers by adding the url of each server. 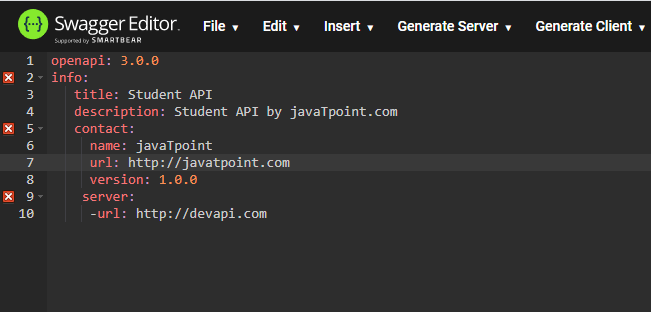
After adding the server, we will add the path. Inside the path, we need to add the resource in the path as well as the operations. 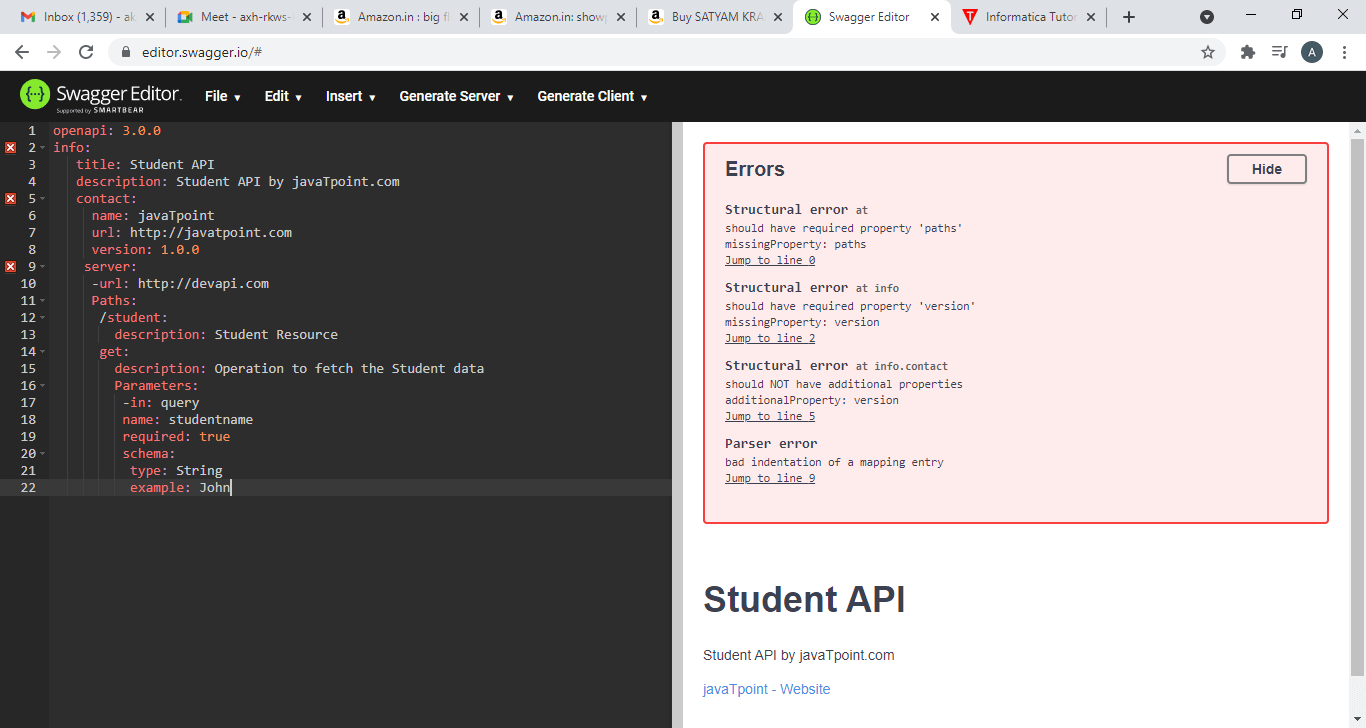
In the above, we have added the Student resource along with its description. Then, we have included the get operation. First, we provided the description of the get method and then we include the parameters that we are going to pass in the Get method. We have passed query-based parameter named as Studentname and the next parameter is required which will be true as studentname parameter is mandatory in the Get method. Now we will represent the schema of the query-based parameter. Inside the schema, we have included the type of the parameter and the example. In this case, we have specified the Query parameter. Now we will specify the response that should be the next level. We will first mention the responses: and then inside the responses, we need to specify the http code for which we are showing the responses. In the real scenario, we should cover all the major response codes. Here, we will specify the happy scenario, i.e., 200 code representing a successful response. After the response code, we will specify the description of the response code, 'Successful response'. Then, we will specify the format of the content, i.e., 'application/json' means that the content will be represented in the json format. Once the format of the content is included, we need to specify the schema. Since this is the response, so get operation will be performed. The type of the operation is array and the array has a list of items so we will specify the items as a key. The items has the properties key. As we can observe in the above screenshot that it contains three properties, i.e., Student id of type integer, Student name of type string and Studentremarks of type string. 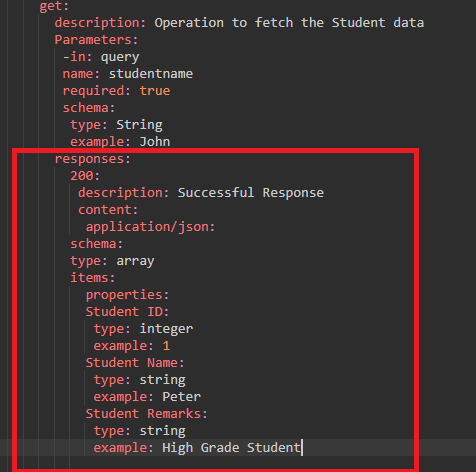
The next operation is the POST operation that we have to perform. First, we will specify the post method in the editor and then we add the description of the POST method 'Add a new Student'. Inside the POST method, we need to specify the requestBody as it is expecting the requestBody in the JSON format in the student object. In the content, we add the format of the content, i.e., 'application/json.' Since it is a POST operation, so we are expecting to have object type rather than an array type. All the properties in the POST operation would be same as the GET operation. After adding all the properties, we will add the responses key in which we add the 201 code that represents the happy scenario. Under the responses key, we add the description of the response code, i.e., 'Record successfully added'. 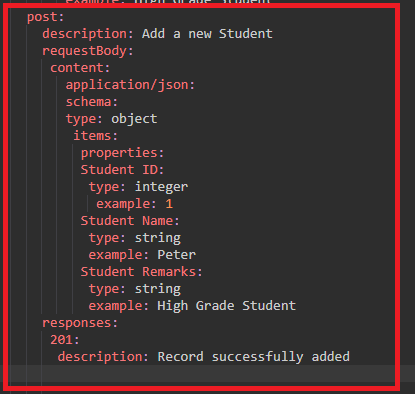
Till now, we are getting the student resource with a query parameter. Suppose we want to get the student resource with a path parameter then we need to add the following code in the path: Below file is the complete API definition file: Output 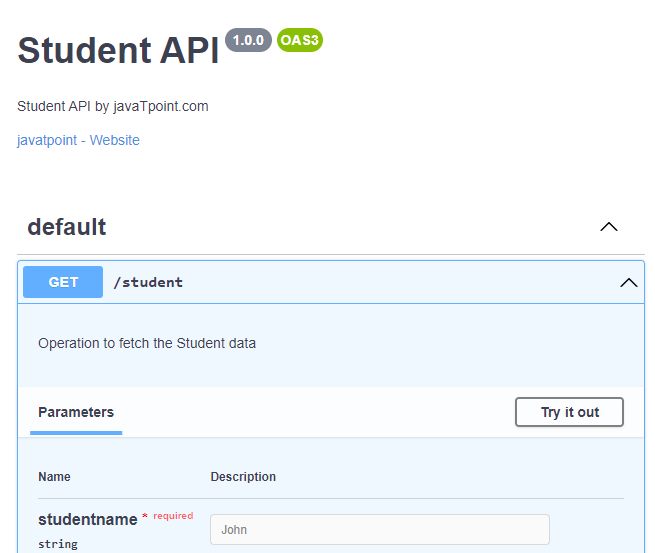
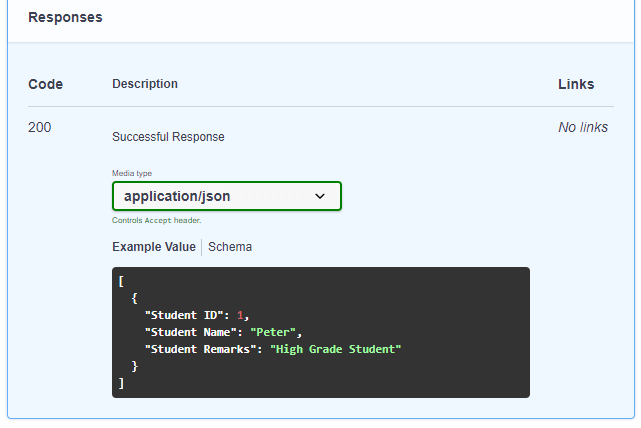
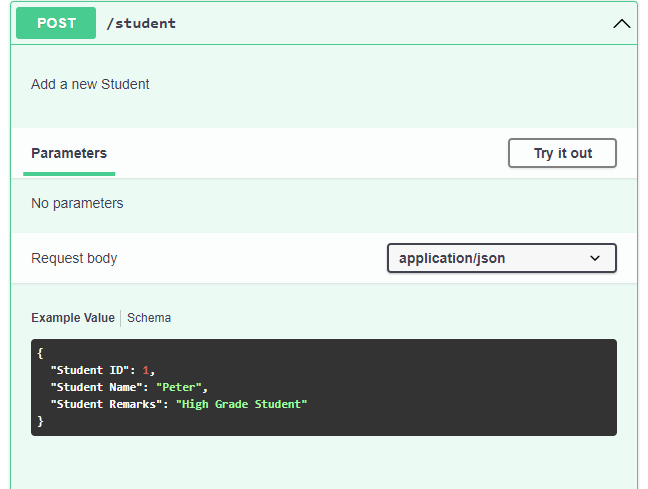
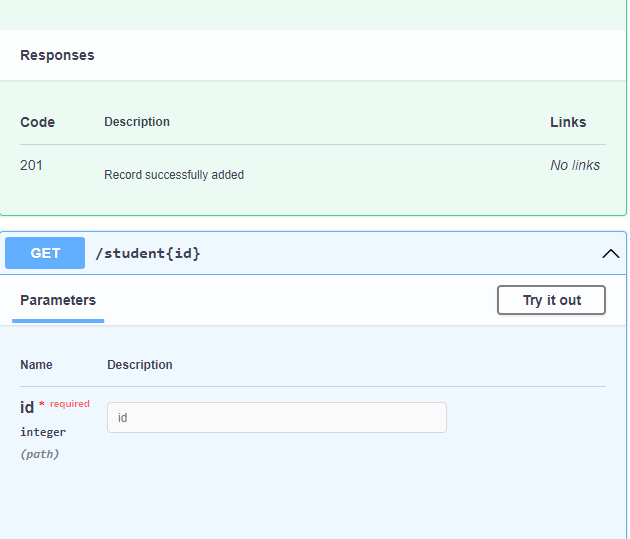
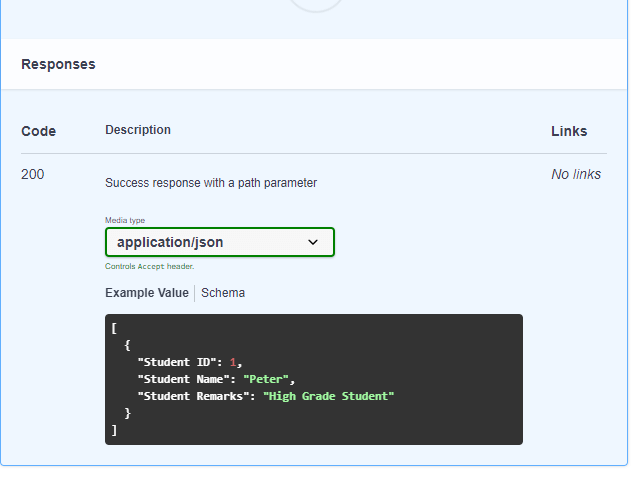
The above screenshots show that the API perform three operations. The first operation is the GET operation accepting the student name, the second operation is the POST operation accepting the requestBody in the JSON format and the third operation is the GET operation accepting the path parameter named as 'id'. |
 For Videos Join Our Youtube Channel: Join Now
Feedback
- Send your Feedback to [email protected]
Help Others, Please Share


Javatpoint Services
JavaTpoint offers too many high quality services. Mail us on [email protected], to get more information about given services.
- Website Designing
- Website Development
- Java Development
- PHP Development
- WordPress
- Graphic Designing
- Logo
- Digital Marketing
- On Page and Off Page SEO
- PPC
- Content Development
- Corporate Training
- Classroom and Online Training
- Data Entry
Training For College Campus
JavaTpoint offers college campus training on Core Java, Advance Java, .Net, Android, Hadoop, PHP, Web Technology and Python. Please mail your requirement at [email protected]
Duration: 1 week to 2 week


