| |

Arduino DueThe Arduino Due is based on the 32- bit ARM core. It is the first Arduino board that is developed based on the ARM Microcontroller. It has two ports, which are named as Native USB port and Programming port. It consists of 54 Digital Input/Output pins and 12 Analog pins. The Microcontroller present on the board is the Atmel SAM3X8E ARM Cortex-M3 CPU. The Arduino Due is also organized using the Arduino (IDE), which can run on various platforms. Here, IDE stands for Integrated Development Environment. The Arduino Due board is shown below: 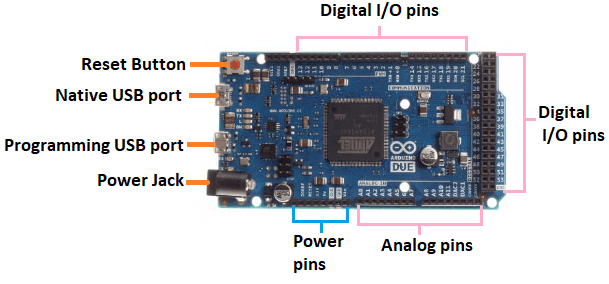
Serial Ports: The Native USB port and the programming USB port are the two ports on the Arduino Due board. Native USB port: The Native port is directly connected to the SAM3X MCU. It uses the serial USB object to support the CDC (Communication Device Class) serial communication. Programming USB port: The programming port is connected to the high-performance 8-bit Microcontroller (ATMEL 16U2), which also acts as a USB to serial converter. Reset Button: It is used to add a Reset button to the connection. To reset the Microcontroller, we need to press and hold the Reset button. Power Jack: The adapter can be plugged-in into the power jack to connect it to the Arduino Due board. Analog pins: The pins numbered as Ao, A1, A2, A3, A4, A5, A6, A7, A8, A9, A10, and A11 are the analog pins. The function of Analog pins is to read the analog sensor used in the connection. These pins can also act as GPIO (General Purpose Input Output) pins. Digital I/O pins: There are 54 digital Input/Output pins. The digital pins have the value HIGH or LOW. What is the difference between Arduino Due and Arduino UNO?The difference between Arduino Due and Arduino UNO are listed below:
What is the difference between Arduino Due and Arduino Mega?The difference between Arduino Due and Arduino Mega are listed below:
Technical Specifications of Arduino DueThe technical specifications of Arduino Due are listed below:
To Get Started with Arduino DueWe can program the Arduino Due using the Arduino IDE. The Arduino IDE is the Integral Development program, which is common to all the boards. We can also use Arduino Web Editor, which allows us to upload sketches and write the code from our web browser (Google Chrome recommended) to any Arduino Board. It is an online platform. The steps to get started with Arduino Due are listed below:
We do not need to install the drivers on the OSX. But we may get a dialog box to open the "Network Preferences" on our computer. Click on Network Preferences -> Click on Apply -> Quit the System Preferences. Due will work but it displays "Not Configured." But, for Windows XP and Windows 7, follow the below steps:
Linux : For Linux, we are not required any driver installation.
We should use the Programming port that is adjacent to the power jack for uploading the sketches. We are required to follow some steps to upload our sketch through the Programming port, which are listed below:
To upload and run, click on the button present on the top panel of the Arduino display, as shown below: 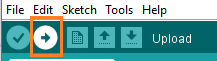
Within the few seconds after the compile and run of code or sketch, the RX and TX light present on the Arduino board will flash. The 'Done Uploading' message will appear once the code is successfully uploaded. The message will be displayed in the status bar.
Next TopicArduino vs Raspberry Pi
|
 For Videos Join Our Youtube Channel: Join Now
Feedback
- Send your Feedback to [email protected]
Help Others, Please Share


Javatpoint Services
JavaTpoint offers too many high quality services. Mail us on [email protected], to get more information about given services.
- Website Designing
- Website Development
- Java Development
- PHP Development
- WordPress
- Graphic Designing
- Logo
- Digital Marketing
- On Page and Off Page SEO
- PPC
- Content Development
- Corporate Training
- Classroom and Online Training
- Data Entry
Training For College Campus
JavaTpoint offers college campus training on Core Java, Advance Java, .Net, Android, Hadoop, PHP, Web Technology and Python. Please mail your requirement at [email protected]
Duration: 1 week to 2 week


