| |

Arduino for LoopThe statements inside the curly brackets under for loop are executed repeatedly according to the specified condition. An increment counter in the for loop is used to increment or decrement the loop repetitions. The for statement is commonly used for repetitive task or operation or to operate on the group of data/pins in combination with arrays. The syntax is: where,
For example, The above statement will execute the loop for five times. The values of i will be from 0 to 4. If the statement is: The above statement will execute the loop six times. The values of i will be from 0 to 5. Note: If we do not want to execute the for loop again and again. Then, we can insert the for loop in the void setup( ) function.Example 1:To print a message 'Arduino' 15 times. To overcome this, programmers prefer to use for loop to execute a task multiple times, while using a single statement. Let's consider the below code. Output: 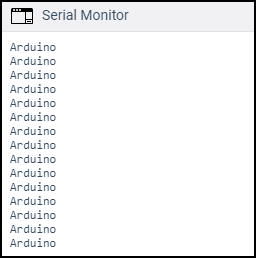
Example 2:To use a multiplication increment The multiplication increment in the for loop will generate a logarithmic progression. Consider the below code: Output: 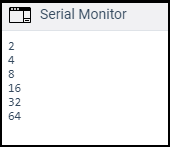
We can also declare the int data type directly in the for loop. For example, Example 3: To fade an LEDHere, fade and LED means that LED will faint slowly. Consider the below code: For the connection, we will connect the positive terminal of the LED in series with the resistor to PIN 11 (PWM pin), and the negative terminal of the LED to GND. Note: The for loops in C++ programming language is much more flexible than other types of programming languages.Example 4:Consider the below code: The above code will print 'Hello Arduino' four times. After that the condition becomes false, control comes out of the loop, and 'DONE' is printed. Output: 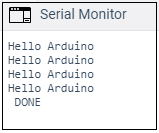
Similarly, we can create any program using for loop accordingly.
Next TopicArduino while loop
|
 For Videos Join Our Youtube Channel: Join Now
Feedback
- Send your Feedback to [email protected]
Help Others, Please Share


Javatpoint Services
JavaTpoint offers too many high quality services. Mail us on [email protected], to get more information about given services.
- Website Designing
- Website Development
- Java Development
- PHP Development
- WordPress
- Graphic Designing
- Logo
- Digital Marketing
- On Page and Off Page SEO
- PPC
- Content Development
- Corporate Training
- Classroom and Online Training
- Data Entry
Training For College Campus
JavaTpoint offers college campus training on Core Java, Advance Java, .Net, Android, Hadoop, PHP, Web Technology and Python. Please mail your requirement at [email protected]
Duration: 1 week to 2 week


