| |

4-bit CounterThe 4-bit counter starts incrementing from 4'b0000 to 4'h1111 and come back to 4'b0000. It will keep counting as long as it is provided with a running clock, and reset is held high. The rollover happens when the most significant bit of the final addition gets discarded. When the counter is at a maximum value of 4'h1111 and gets one more count request, the counter tries to reach 5'b10000, but since it can support only 4-bits, the MSB will be discarded, resulting in 0. The design contains two inputs, one for the clock and second for an active-low reset. An active-low reset is where the design is reset when the reset pin's value is 0. There is a 4-bit output called out, which essentially provides the counter values. 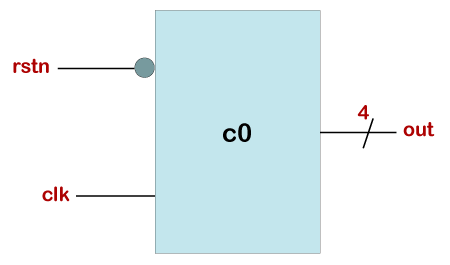
Electronic Counter ExampleThe module counter has a clock and active-low reset (n) as inputs and the counter value as a 4-bit output. The always block is executed whenever the clock transitions from 0 to 1, which signifies a positive edge or a rising edge. The output is incremented only if reset is held high or 1, achieved by the if-else block. If reset is low at the clock's positive edge, then output is reset to a default value of 4'b0000. Testbench We can instantiate the design into our testbench module to verify that the counter is counting as expected. 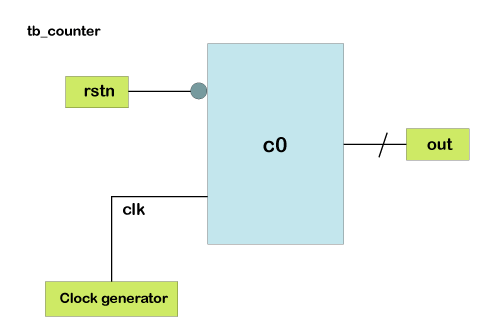
The testbench module is named tb_counter, and ports are not required since this is the top-module in simulation. However, we need to have internal variables to generate, store and drive the clock and reset. For this purpose, we have declared two variables of type reg for clock and reset. We also need a wire type net to make the connection with the design's output; else, it will default to a 1-bit scalar net. The clock is generated via always block, which will give a period of 10-time units. The initial block is used to set initial values to our internal variables and drive the design's reset value. The design is instantiated in the testbench and connected to our internal variables to get the values when we drive them from the testbench. We don't have any $display statements in our testbench, and hence we will not see any message in the console. Note that the counter resets to 0 when the active-low reset becomes 0, and when to reset is de-asserted at around 150ns, the counter starts counting from the next occurrence of the clock's positive edge. Hardware Schematic 
Next TopicVerilog Mod-N Counter
|
 For Videos Join Our Youtube Channel: Join Now
Feedback
- Send your Feedback to [email protected]
Help Others, Please Share


Javatpoint Services
JavaTpoint offers too many high quality services. Mail us on [email protected], to get more information about given services.
- Website Designing
- Website Development
- Java Development
- PHP Development
- WordPress
- Graphic Designing
- Logo
- Digital Marketing
- On Page and Off Page SEO
- PPC
- Content Development
- Corporate Training
- Classroom and Online Training
- Data Entry
Training For College Campus
JavaTpoint offers college campus training on Core Java, Advance Java, .Net, Android, Hadoop, PHP, Web Technology and Python. Please mail your requirement at [email protected]
Duration: 1 week to 2 week


