| |

Spline in AutoCAD
Let's understand by two examples. Example 1: Using Fit points The steps to create spline using fit points are listed below: 1. Select the Spline icon under the Draw interface from the ribbon panel, as shown below: 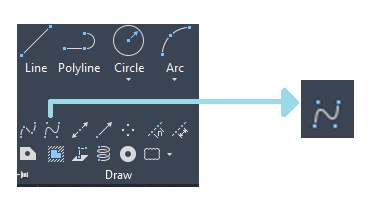
Or Type SPL on the command line or command prompt and press Enter. 2. Click on the 'Method' option on the command line, as shown below: 
3. Click on the 'Fit' option, as shown below: 
4. Specify the fit points by clicking with the help of the mouse. It is shown below: 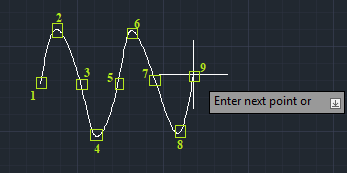
Continue specifying points and press Enter or Esc to exit. The created spline is shown below: 
Example 2: Using CV The steps to create spline using Control Vertices (CV) are listed below: 1. Select the Spline icon under the Draw interface from the ribbon panel. Or Type SPL on the command line or command prompt and press Enter. 2. Click on the 'Method' option on the command line, as shown below: 
3. Click on the 'CV' option, as shown below: 
4. Specify the vertices by clicking with the help of the mouse. It is shown below: 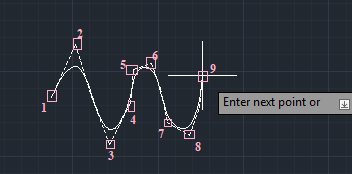
Continue specifying points and press Enter or Esc to exit. The created spline is shown below: 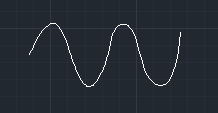
Note: We can also create splines with a closed-loop. The shape depends on the points defined by us. We can define as many points according to our requirements.Edit Control VerticesLet's consider the above spline. The steps are listed below: 1. Click on the spline. The vertices on the spline will look like the below image: 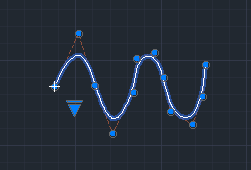
2. Click on any particular vertex. The operations such as Stretch, Add, Refine, and Remove can be performed on different vertices, according to the requirements. 3. Press the Ctrl button to switch between different operations. Spline with degreeWe can create a spline with any degree. The steps to create such spline are listed below: 1. Select the Spline icon under the Draw interface from the ribbonpanel. Or Type SPL on the command line or command prompt and press Enter. 2. Click on the 'Degree' option on the command line, as shown below: 
3. Specify the degree of a spline. 4. Press Enter. 5. Specify the points by clicking with the help of the cursor. The spline with a specified degree will be created. For example, consider the below image: 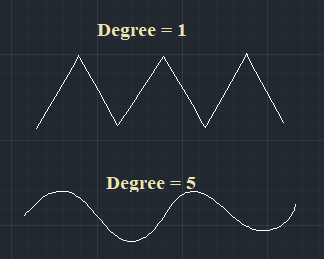
To convert spline into a polyline The steps to convert a spline into a polyline are listed below: 1. Type SPLINEDIT on the command line. 2. Press Enter. 3. Select the spline to convert. 
The command line will look like the below image: 4. Type P and press Enter. 5. Specify the precision value between 0 and 99. 6. Press Enter. The spline will be converted to the polyline.
Next TopicHow to setup AutoCAD for 3D
|
 For Videos Join Our Youtube Channel: Join Now
Feedback
- Send your Feedback to [email protected]
Help Others, Please Share


Javatpoint Services
JavaTpoint offers too many high quality services. Mail us on [email protected], to get more information about given services.
- Website Designing
- Website Development
- Java Development
- PHP Development
- WordPress
- Graphic Designing
- Logo
- Digital Marketing
- On Page and Off Page SEO
- PPC
- Content Development
- Corporate Training
- Classroom and Online Training
- Data Entry
Training For College Campus
JavaTpoint offers college campus training on Core Java, Advance Java, .Net, Android, Hadoop, PHP, Web Technology and Python. Please mail your requirement at [email protected]
Duration: 1 week to 2 week


